Saturday, December 28, 2013

Like a Fine Wine....

Hi Blog Friends!

As promised, here are two more cards in the wine card series.  The images were colored with Copics.  I used kraft card stock for the base and embossed it with a Cuttlebug folder.  I lightly brushed the raised embossed design with a distress pad.  The die cut is by Spellbinders, embossed it, then added Stickles glitter glue to the edges.  Tiny green rhinestones were added to the bottom of the card.  The images are by Fiskar's clear stamps.


Here's the same image, but on this card I added a green ribbon around the kraft card stock.


Here's a close-up of the Stickles glitter glue on the edge of the embossed die cut.  


Thanks for stopping by today.  I'll be back with another card soon.  Until next time....


Friday, December 27, 2013

Aged to Perfection


Happy Weekend Blog Friends!

For the next couple of days, I'll be posting my "wine series" cards.  I have several friends who like wine and are much more knowledgeable than I am, but I enjoy a nice glass of wine once in while too.  This is a stamp set from Fiskar's, that has several different stamps in the set relating to wine.  It also has some nice coordinating sayings.  I embossed the background with kraft card stock, then lightly brushed a Vintage Photo distress pad over the little dots.  A black organza ribbon is tied around the kraft paper.  I used a Spellbinder die for the white scallop edged circle, and used another distress pad on the inner part of the circle.  The wine colored circle behind the scalloped circle is a Spellbinder circle die.  Stickles dot the holes in the cheese wedge, and the edge around the scallops on the white circle piece.  Colored with Copics.


That's all for today.  I hope your Christmas was peaceful, and filled with much happiness.  Ours was very quiet, but nice.  I'll be back soon with the next wine card.  Until next time.....


Monday, December 23, 2013

Marry Christmas Blog Friends!


Merry Christmas Blog Friends!

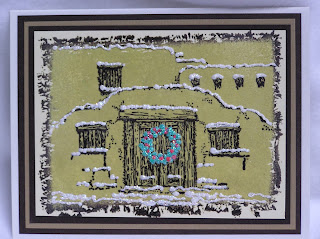
I hope you all are ready for Christmas.  I'm not yet, but am getting there, slowly but surely.  It'll be a pretty simple Christmas this year.  Not a whole lot happening, but that's okay too.  Today's post is a card I made at the B&J Art Rubber Stamps booth, at the last stamp convention.  Here's an old adobe hacienda covered in snow.  Judy (B&J owner)  uses ink pads by Inkcredibles.  We also used Liquid Applique by Marvy to add the snow, heated it a bit and sprinkled it with very fine glitter to make the snow and wreath sparkle.  Green Liquid Applique was used to make the wreath, then dotted it with red applique.   I love the way the card looks up close and personal.  Really sparkly!  There are many houses in Santa Fe, that look like this during the holiday season.  It's so much fun to drive around and look at the lights and decorations.  Our downtown Plaza area is beautiful this time of year.  I'll try to find a pic and post later.

We wish you and yours a very Merry Christmas and a Happy 2014.  May your New year be filled with many blessings and peace.


Thanks for stopping by today.  Take care, stay warm and I'll be back later.  Until next time...


Saturday, December 21, 2013

Joy to the World


Hello Blog Friends!

Well, the predicted snow has not arrived in Santa Fe.  Maybe it's going around us like it has so many times in the past.  Today I'm sharing a card I made at a November "make & take" at the Hen House Paperie in Albuqueruqe, NM.  The store owner, Charlene taught this quick and easy card.  It was really fast, and ever so easy to put together.  We used two different blue Memento ink pads, a blue organza ribbon and card stock in white and navy blue.    As you can see, the background was stamped first with the lightest blue, then over stamped with the darker blue.  Same with the sentiment piece.  A faint light blue snowflake, then the words stamped on top of that in darker blue.  If I remember correctly, the stamps are Impression Obsession.  Pretty stamps.


That it for today.  I'm sad to report that I did not get around to making Christmas cards this year.  Too much going on with mother being in hospital, nursing home and now in assisted living. Thanks for stopping by today!  Until next time.....

Wednesday, December 18, 2013

December '13 Tim Holtz ATC - Old Jalopy & Christmas Tree


Hello Blog Friends!

As I mentioned in my previous post, the ATC for December is "Tim Holtz."  I think it was something like Anything and Everything Tim Holtz.  Well, I almost made it, but had to add a mountain range since I live in Santa Fe, New Mexico.  It just looked too plain without the snowy mountains.  I will list supplies at the end of the post.  The truck is the Tim Old Jalopy.  The trees were part of a Tim border die, and the snowflakes are Tim's.  


This is the ATC I'm trading.  


This is one I did with splattered snow, and I like it also.  I only made one with the snow. 


Thought you'd like to see my prototype.  I was playing around with ideas and this was the one that lead me to the end result.  Isn't it fun to see what people come up with in the beginning?


Thanks for stopping by today!  Until next time....

Tim Holtz Old Jalopy (mini) Movers & Shapers die
Tim Holtz Snow Flurries on the edge die
Tim Holtz Tree Line on the edge die
Mountain Range by Stamp A Mania Rubber Stamps
  (www.stampamania.com) in a beautiful mountain range set they sell
Copic markers
Blue glitter card stock
Gold metallic paper in the jalopy windows
White gel pen (snow on mountain tops)


Thursday, December 12, 2013

Artist Inspired ATC

Hi Blog Friends!

Last month, our stamp group decided that the ATC theme for November would be an "Artist Inspired" ATC ...actually, I think have the title wrong, but it was something like that.  We were to pick an artist who we admire and make our ATC.  I chose Georgia O'Keeffe, in case you haven't guessed.

I really don't have a favorite artist, but thought this would reflect some O'Keeffe inspiration.  I do love the simple lines and colors that O'Keeffe painted.  They're right up my alley.  Let me tell you...the antlers were a little tricky to cut out.  Had to have them tho.  :o)  And since I love orange poppies, it was a fun color to do.

Both the antlers and the orange poppy are cut out.  Kraft paper is the base background, distressed the edges and then added darker distressing with Vintage Photo by Ranger.  Colored with Copics.  The center of the flower is Liquid Pearls.  I'll list all supplies at the end of this post.  December's ATC theme is "Tim Holtz" so I'll post that one soon.


Thanks so much for stopping by today.  Until next time.......

Deer Antlers:  Stampabilities
Poppy:  Hero Arts
Copic markers
Liquid Pearls, Onyx Pearl
Ranger Vintage Photo
Kraft card stock
Black card stock

Monday, December 9, 2013

The Pink Balloon


Hi Everyone!

Today I'm sharing the Pink Balloon House Mouse.  The previous post was the same stamp, different colors.  This card is a little more feminine with pinks and yellows.  I used flowers and a tiny brad for the embellishment.  Scrapbook paper for the background base, and coordinating solids back the image.

I hope it's warmer where you're at today.  Just looked at the temperature in Santa Fe, and it's 14 degrees....brrrrrr.  More snow was predicted, but none yet.  I'm glad because that means the streets won't be icy and snow packed.  Ya hooooo!   :o)


Thanks so much for stopping by today.  Until next time.....happy stamping!


Saturday, December 7, 2013

House Mouse Pop


Hi Blog Friends,

Quick post today.  Today's card is a little House Mouse.....getting ready to pop the balloon while his poor little friend is taking a nap,what a stinker!  lol   I love House Mouse stamps.  They're so much fun to color and the people I send them to like them a lot.  Now I know that some people think they're too "cutsey", but I take into consideration who will receive the card.  I send these little cuties to those who I know like them.  And also, kiddos really like these cards.  :o)  I think that's what I love so much about card making....all kinds of images for all kinds of folks.

I used Copics for coloring.  Baker's twine and a blue button for embellishing, and teeny tiny brads in the four corners.  Scrapbook paper is the background.


Thanks for stopping by today!  Until next time....


Thursday, December 5, 2013

Wishing I was here.........


Hi Blog Friends!

I was looking through blog pics this morning and came across this card and thought "gee, I wish I was there instead of looking at 6" of fresh fallen snow this morning.  Actually, the snow is beautiful.  What I'm not too nuts about is the temperature.  It was 17 degrees when I got up, and now it's up to a balmy 22 degrees.  I'm not a cold weather girl.  Oh well, we need snow for our water supply next summer, so I'll be quiet about the cold now.

Today's card is stamped with Stampscapes stamps.  Love these stamps.  If you're not familiar with Stampscapes stamps, you build a scene with the stamps.  I think I used five different stamps here.  The background was brayered with a Kaleidacolor Riviera ink pad.  Mark (Stamp A Mania rubber stamp company owner) and I have an ongoing joke about brayering.  Mark likes to tease me and calls it the "dreaded brayering technique."  I have a love/hate relationship with brayering.  If you've ever brayered, you can relate.  Sometimes the background are gorgeous, sometimes not.  I'm too particular about brayering, and need to relax a bit.  I'm not fond of streaky brayering.  See....too picky!  lol  Anyway, you get the idea.  


Thanks for stopping by today.  I hope you all are staying warm wherever you are.  If you're in Hawaii, I'm jealous!  Until next time....


Monday, December 2, 2013

In My Thoughts & Prayers


Hello Blog Friends!

I hope you all survived the Thanksgiving holiday.  We had a nice quiet one, eating early with mom at the nursing home, then running over to our son's for dinner with his family and his in-laws.  Today's card is one I made at convention.  I'm sorry, I don't know who makes the stamps or even what the technique was we used that day.  Looks like stippling colors on to the card stock from an ink pad, and possibly using torn papers to form the mountains in the background.  I love the way the trees look in front of what appears to be a partially sunny sky.  I used a Martha Stewart punch to add the border at the bottom of the card and used three coordinating pieces of card stock for the card base.


The trim appears a light cream in this pic, but it really is yellow like top pic.

Thanks for stopping by today.  Until next time....


Hello again! A "long" get well card

HELLO BLOG FRIENDS! It's been a very long time since I've blogged.  You know how life gets in the way of things, and we have cer...